Turning plastic bottles into stylish, sustainable DIY projects is one of the most accessible ways to reduce waste while adding personality to your home and garden. This guide walks you through chic plastic bottle crafts that look intentional and modern, not like last-minute school projects.
In this article on plastic bottle crafts and creative upcycling, you will find practical, design-focused ideas that respect both function and aesthetics. From home decor to outdoor solutions, each section is crafted to help you transform used bottles into pieces you will actually want to live with and display.
Chic Home Decor Ideas Using Upcycled Bottles
Upcycled plastic bottles can become surprisingly elegant decor when you focus on clean lines, consistent color palettes, and thoughtful finishes. Instead of leaving labels and bright branding exposed, the key is to strip everything back, then rebuild the look using paint, twine, fabric, or natural textures. With a little planning, you can create plastic bottle crafts that pass for boutique home accessories rather than obvious recyclables.
In my experience working with clients who value sustainable design, the projects that stay in use are the ones that look intentional and cohesive with the rest of the room. That means matching your DIY decor to existing colors, styles, and materials, rather than forcing neon plastic into a soft neutral living room or a rustic entryway. Think of each bottle as a blank canvas that can be shaped, sanded, painted, and accessorized.
It is also important to stay realistic about durability and safety. Plastic bottles are lightweight and can tip easily, so any project that needs stability, such as floor vases or tall centerpieces, should be weighted with sand, pebbles, or concrete at the base. For any project that involves heat or light, like faux candles or string lights, use low-heat LED sources and keep plastic away from open flames to avoid melting or harmful fumes.
- Strip labels thoroughly using warm water, dish soap, and a bit of baking soda to remove sticky residue.
- Group projects by color palette, such as all white, soft pastels, black and metallic, or earthy neutrals.
- Add weight to any tall or top-heavy bottle craft by filling the base with sand or small stones.
- Use low-odor acrylic paint or spray paint specifically labeled as suitable for plastics for better adhesion.
- Choose matte or satin finishes for a more upscale look; high gloss can easily highlight imperfections.
Elegant Bottle Vases & Centerpieces
Plastic bottles make excellent vases and centerpieces when you refine their silhouette and surface. Trim the top collar and any irregular ridges with a craft knife, then sand edges lightly for a smooth finish. You can paint the entire bottle in solid colors or use painter’s tape to create geometric patterns that fit contemporary decor styles. Neutral white, black, or muted tones usually look more sophisticated than bright primary colors.
From hands-on projects, I have found that layering paint works best: apply a plastic primer or a light sanding first, then two or three thin coats of acrylic or spray paint. For a ceramic-like finish, lightly dab wet paint with a sponge to add subtle texture. To enhance the effect, add decorative elements like sisal rope wrapped around the neck, a slim leather cord, or metallic leaf accents for a luxe touch.
Since plastic bottles are very light, real flowers in water can make the vase unstable if the neck is narrow or the stems are long. To avoid tipping hazards, especially on busy tables, consider using:
Faux flowers or dried branches, which are lighter than water-filled arrangements.
A small glass jar inserted inside the bottle to hold water and act as an internal weight.
Heavier filler like stones at the bottom to balance the weight of tall stems.
Cut bottles at varying heights to create layered centerpieces for dining tables or mantels.
Use frosted glass-effect spray to give the look of etched glass on clear plastic bottles.
Wrap midsections with jute, macrame cord, or fabric scraps to disguise plastic contours.
Group three to five vases together rather than one single piece for a designer-style vignette.
Place vases on a tray or wooden board to visually unify the arrangement and make it easy to move.
Stylish Storage & Organizers from Plastic Bottles
Organizing small items is one of the most practical uses for plastic bottle crafts. Sturdy bottles can be transformed into pen holders, makeup organizers, craft supply caddies, or even desk drawers when sliced horizontally. A simple approach is to cut the bottom third of several bottles, sand the edges, and mount them side by side on a board or in a drawer for modular compartments.
Based on real-world testing in home offices and studios, transparent bottles work best when you want quick visual access to contents, such as beads, screws, or stationery. Opaque or painted bottles are better suited for items you prefer to hide, like cables, chargers, or extra bathroom supplies. Adding labels on each container, either with a label maker or handwritten tags, keeps the system functional rather than turning into a cluttered set of random containers.
Safety is straightforward here, but precision matters. Always use sharp scissors or a craft knife on a stable surface and cut away from your body. For households with children, ensure all cut edges are smoothed with sandpaper or covered using tape, bias binding, or glued-on fabric. This reduces the risk of small cuts and makes the organizers feel more finished.
- Turn tall bottles into divided pencil cups by inserting a cardboard tube inside as a partition.
- Use horizontal bottle halves mounted on a board as wall organizers for mail, notes, and keys.
- Repurpose large detergent bottles into portable cleaning caddies by cutting away the top front section.
- Cut several uniform bottle bottoms and stack them in drawers for socks, underwear, or small accessories.
- Add adhesive hooks or Velcro strips to the back of small bottle organizers for flexible positioning.
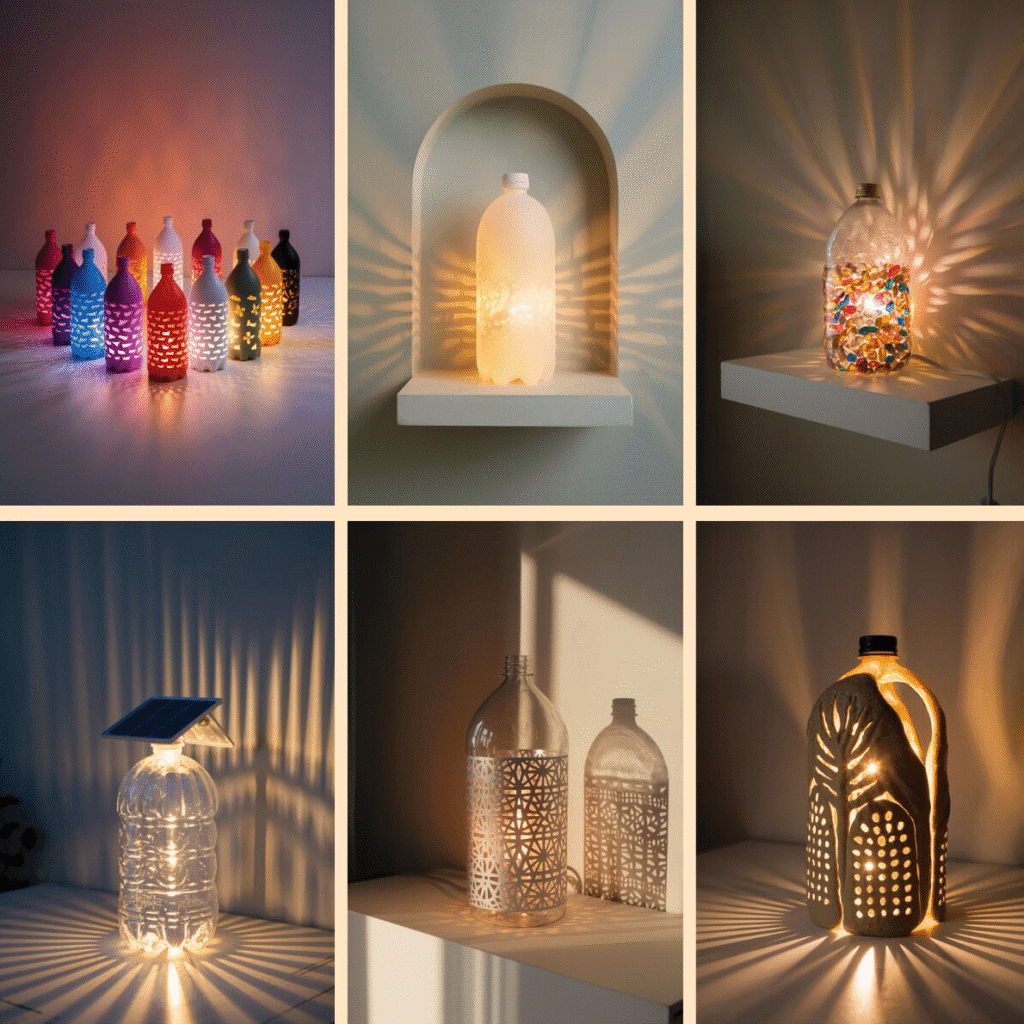
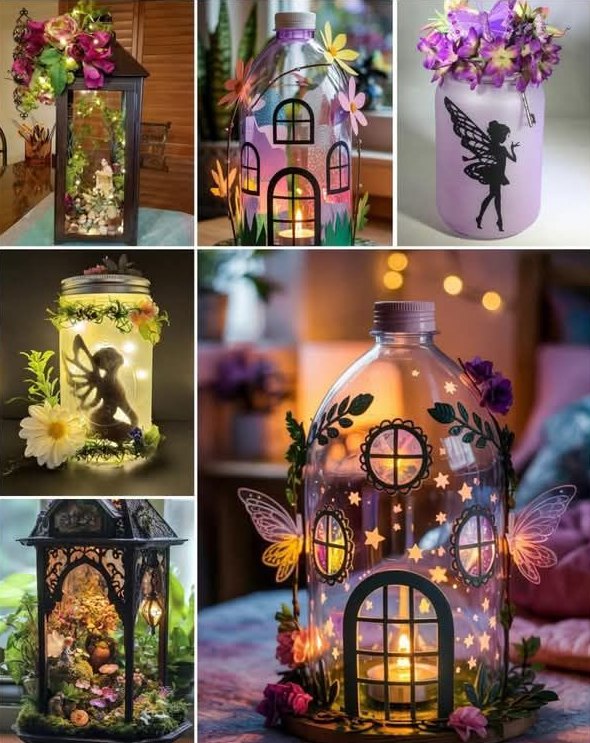
Ambient Lighting & Lanterns with Plastic Bottles
Soft, diffused lighting from upcycled plastic bottle lanterns can transform a space, but it must be done with heat safety in mind. Always rely on cool LED tealights, fairy lights, or LED candles specifically rated for enclosed use. Avoid traditional wax candles or any open flame near plastic since it can melt, warp, or release fumes at relatively low temperatures. LEDs operate at much cooler temperatures and are the safer choice for indoor lantern crafts.
In my experience creating DIY lighting for events and patios, translucent or frosted bottles produce the most appealing glow. Clear plastic can be toned down with a light coat of white or pastel spray paint, leaving patterns or cutouts unpainted so the light can shine through. Cutting small shapes like stars, leaves, or geometric slits into the bottle body allows light to escape in decorative beams and shadows.
You can hang bottle lanterns from ceilings, curtain rods, branches, or pergolas. For indoor use, it is best to keep electrical components rated for indoor use only and follow manufacturer instructions regarding moisture and weight. For outdoor bottle lights, ensure that any wiring or battery pack is protected from rain and that outlets are GFCI protected, as recommended for outdoor electrical safety.
- Use frosted finish or translucent paint on clear bottles to soften and diffuse the light.
- Insert battery-operated LED fairy lights into the bottle through a small cut at the back or base.
- Create Moroccan-inspired patterns with a stencil and cutting tool for intricate light effects.
- Hang lanterns using sturdy twine or wire wrapped securely around the neck or cut handle.
- Arrange several small lanterns along a windowsill, shelf, or balcony rail for gentle evening ambience.
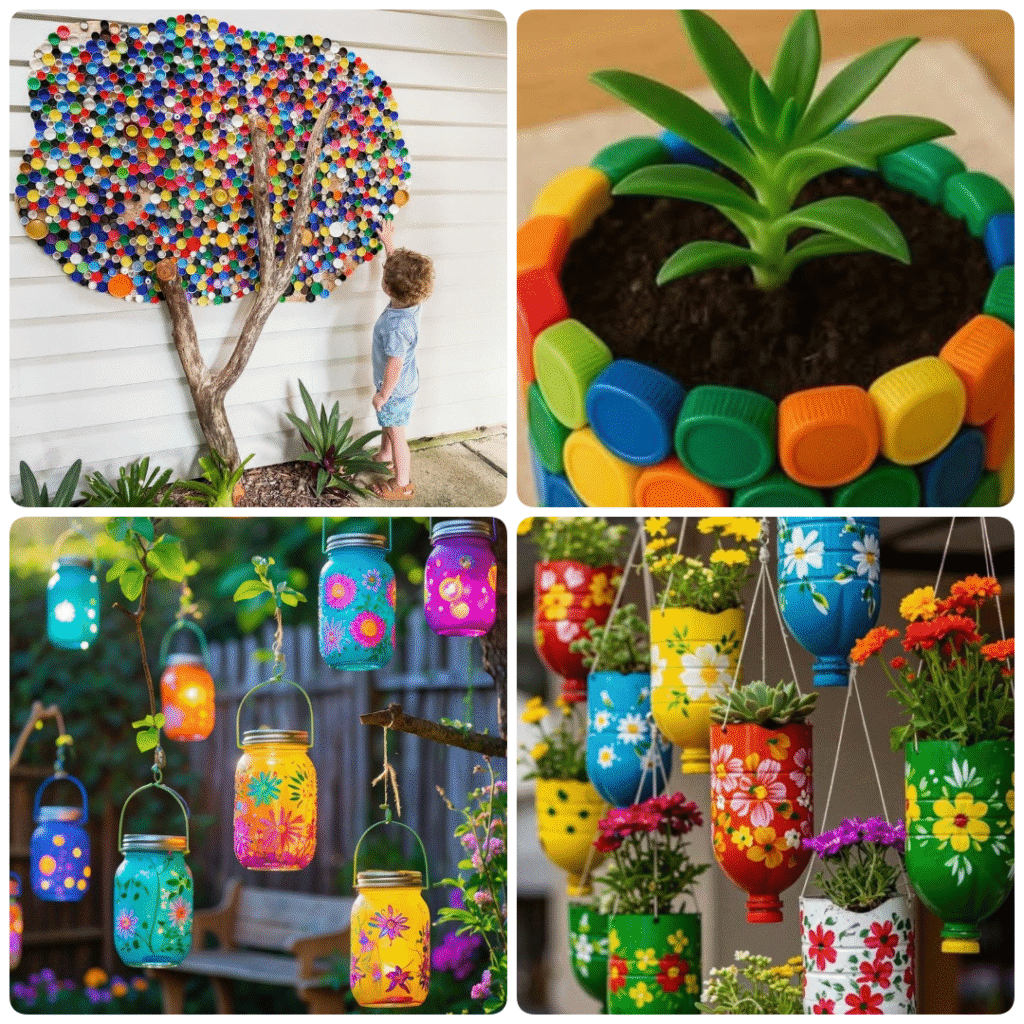
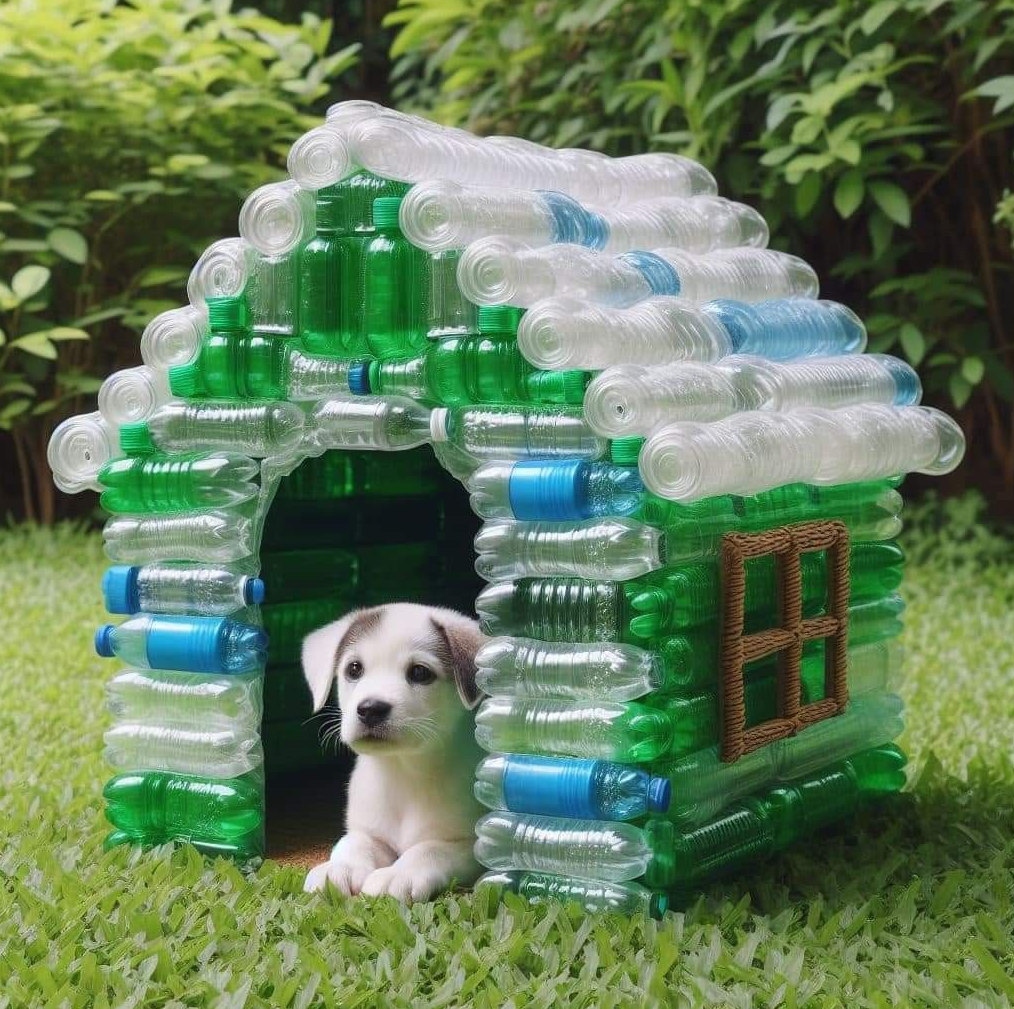
Garden & Outdoor Crafts with Reused Plastic Bottles
Outdoor spaces are perfect environments for plastic bottle crafts because they blend upcycling with gardening and functional design. Bottles are inherently weather resistant, although prolonged UV exposure can make some plastics brittle over time. Where possible, choose thicker bottles and consider painting or partially shading them to extend their lifespan outdoors. For plastic bottle garden crafts, prioritize sturdy construction that can withstand wind and occasional impact.
From hands-on projects in small urban gardens and balconies, I have seen reused plastic bottles become planters, mini greenhouses, bird feeders, watering tools, and even parts of drip irrigation systems. These ideas are especially valuable in regions where access to gardening supplies is limited, since bottles are widely available and often free. With careful cutting and drilling, they can support soil, water, and plants without leaks.
Always consider local climate and plant needs when using plastic bottle planters or greenhouses. Transparent bottles can increase heat and humidity significantly under strong sun, which helps some seedlings but can harm others. As a factual guideline, most leafy greens and herbs prefer moderate light with good ventilation, while many succulents need excellent drainage and should not remain in constantly wet soil. Add drainage holes to outdoor bottle planters to prevent root rot.
- Choose thick, sturdy bottles for outdoor projects that will be exposed to sun, wind, and rain.
- Use UV-resistant paints and outdoor-rated sealants if you are painting bottles for the garden.
- Drill or punch drainage holes in all planters to avoid standing water and root damage.
- Anchor hanging crafts firmly, especially in windy areas, using strong wire or heavy-duty hooks.
- Monitor plants regularly for overheating inside bottle greenhouses during hot weather.
Vertical Bottle Gardens & Hanging Planters
Vertical gardens made from reused plastic bottles are a space-saving solution for balconies, fences, and small patios. The simplest approach is the horizontal pocket style: lay bottles sideways, cut a large window on the top, poke drainage holes in the bottom, then attach them to a wall or fence using sturdy cord or metal brackets. These pockets can support herbs, strawberries, or small flowering plants in a minimal footprint.
In my experience working with compact urban balconies, spacing and drainage are the make-or-break factors. Bottles should be placed so that excess water from upper rows drips into lower rows without flooding them. A good practice is to stagger bottles diagonally so that each plant still gets light and air circulation. Use lightweight potting mix rather than dense garden soil to avoid compaction and excess weight on the structure.
Hanging planters made from bottle bottoms or entire small bottles can add dimension to pergolas or porch ceilings. Safety-wise, ensure cords or chains are rated for outdoor use and able to handle at least double the weight of the filled planter. For renters, removable hooks or rail-hanging systems allow you to install vertical gardens without drilling into walls or fences.
- Cut side windows large enough to comfortably plant and later remove roots if needed.
- Line the bottom with a thin layer of gravel before adding soil to support drainage.
- Select plants with shallow root systems such as lettuce, basil, thyme, or small succulents.
- Attach bottles using rope threaded through holes near each end or metal brackets screwed into wood.
- Check the weight limit of balcony railings before hanging multiple planters to avoid overloading.
Functional Bird Feeders & Wildlife Helpers
Plastic bottle crafts can support local wildlife when turned into bird feeders, insect hotels, or water stations. Basic bird feeders are easy: cut small feeding ports near the lower half of a bottle, insert wooden spoons or perches, and hang the bottle filled with seed. For safety, edges around feeding holes should be smooth so birds do not cut their feet or beaks.
From hands-on work with backyard bird-friendly designs, I have found that placement is just as important as feeder construction. Bird feeders made from plastic bottles should be hung high enough to be out of reach of most predators, ideally 5 to 10 feet above ground, and located near some tree cover to give birds a sense of security. However, feeders should be far enough from windows to reduce collision risks.
Hygiene is critical: plastic surfaces can accumulate mold or bacteria when exposed to moisture and leftover seed. To maintain a healthy feeding environment, empty and wash bottle feeders with mild soap and water at least once every 1 to 2 weeks, more often in warm or rainy climates. This practical maintenance step is often overlooked yet crucial for bird health.
- Use clear bottles for easy monitoring of seed levels and to spot moisture buildup.
- Drill or cut smooth feeding holes, then sand edges or cover them with tape for safety.
- Add shallow wooden spoons or dowels through the bottle as perches below each feeding hole.
- Hang feeders using strong cord, wire, or metal hooks securely tied around the bottle neck.
- Clean feeders regularly to minimize mold growth and disease spread among birds.
DIY Irrigation, Watering Tools & Mini Greenhouses
Plastic bottles can be turned into simple irrigation and watering systems that conserve water and support plant health. A basic drip irrigation setup uses a bottle with tiny holes in the cap and sides, buried partly near plant roots with the neck downward. When filled with water, it slowly seeps into the surrounding soil. While this is not as precise as commercial systems, it can reduce surface evaporation and help maintain more consistent moisture levels.
In my experience testing DIY irrigation in vegetable beds, hole size and number are critical. Use a small nail or heated pin to create several very small holes in the cap. If the water empties too quickly, the holes are too large. If it does not drip at all, add one or two additional pinholes. For safety, avoid using open flames for heating tools; instead, rely on mechanical drilling or hand tools when possible.
Mini greenhouses are another effective plastic bottle craft. Large, clear bottles can be cut at the bottom and placed over seedlings like cloches. This traps humidity and warmth, which helps germination in cooler climates. However, during hot days, temperatures can spike inside the bottle, so you must vent or remove the cover to prevent heat stress. As a factual note, most vegetable seedlings perform best when kept between roughly 60 and 75 degrees Fahrenheit, with good air flow.
- Use 1 to 2 liter bottles for drip irrigation near individual plants or shrubs.
- Bury bottles at least halfway to stabilize them and keep roots shaded from sunlight.
- Adjust hole size using small drill bits, nails, or specialized punches for more control.
- Place mini greenhouse covers only on cool days or nights, and lift them when temperatures rise.
- Clean irrigation bottles periodically to prevent algae buildup or clogged holes.
Creative Outdoor Decor & Playful Projects
Beyond function, plastic bottle crafts can bring color and movement to outdoor spaces through wind spinners, garden totems, and playful decor for children. Cutting bottle sides into long, even strips and twisting them produces spiral wind spinners that catch the breeze. Painting them in coordinated colors can create a visual link across different parts of a yard or balcony.
Based on my past work with family-friendly gardens, interactive elements keep children engaged and more invested in outdoor spaces. Children can safely participate in painting and decorating bottles, while adults handle cutting or drilling. Simple projects like bottle totems, where multiple bottle shapes are stacked on a rebar or sturdy dowel, can become a focal point among plants or along pathways.
Outdoors, durability and attachment methods matter. Use weather-resistant paints and outdoor glue or cable ties instead of indoor craft glue that can fail in humidity or rain. For any tall vertical decor, drive support rods deep enough into the ground to resist wind. As a conservative guideline, bury at least one-third of the total pole height for stability.
- Create wind spinners by cutting vertical strips from the body of a bottle and twisting them gently.
- Paint bottles in complementary colors that match planters, furniture, or outdoor textiles.
- Stack bottle shapes on a metal rod to form whimsical garden totems or sculptural pieces.
- Involve kids in non-cutting steps like painting, filling, or arranging for safe participation.
- Use UV-resistant clear coat sprays to help preserve color against fading sunlight.
Care, Cleaning & Long-Term Sustainability Tips
Sustainable DIY is not only about creating objects but also about caring for them so they replace new products for as long as possible. Plastic bottle crafts should be examined periodically for cracks, sharp edges, or structural fatigue, especially if used outdoors or for holding weight. When a piece is too damaged to repair, disassemble it and recycle any parts that meet your local recycling guidelines.
From long-term observation of upcycled projects, I have seen that pieces with simple, modular construction are easier to fix or reconfigure. For example, tying bottle planters onto rails with cord allows you to re-tie or move them instead of throwing everything away when one cord fails. Using screws, hooks, and removable ties rather than permanent adhesives often makes projects more repairable and adaptable over time.
Cleaning methods should be gentle enough not to damage paint or finishes. For indoor decor, dust with a soft cloth and use a slightly damp cloth with mild soap if needed. For planters and outdoor items, rinse with water and scrub lightly with a soft brush. Avoid harsh solvents that could damage surfaces or leave residues. When in doubt, test cleaners on an inconspicuous area first.
- Inspect outdoor crafts every season for brittleness or sharp edges and repair as needed.
- Standard recycling rules vary, so confirm whether painted or glued bottles are accepted locally.
- Use removable fasteners like zip ties or hooks to make maintenance and repositioning easier.
- Clean with mild soap and water; avoid abrasive pads that can scratch painted surfaces.
- Plan ahead to ensure that if a project reaches end-of-life, as many components as possible can be recycled.
Conclusion: Bringing Style, Craft, and Sustainability Together
Stylish plastic bottle crafts show that sustainable DIY can be both practical and beautiful, turning everyday waste into decor, organizers, and garden helpers that feel intentional rather than improvised. When you prioritize good design, safe techniques, and thoughtful long-term use, each upcycled bottle becomes a small but meaningful step toward a lower-waste lifestyle.
By integrating chic home decor ideas like painted vases, ambient lanterns, and minimalist organizers with outdoor solutions such as vertical gardens, wildlife feeders, and DIY irrigation, you create a connected ecosystem of reuse in your home. Based on real-world projects, the key is consistent aesthetics, appropriate materials, and regular care so these pieces genuinely replace new purchases instead of becoming temporary experiments.
As you explore more plastic bottle crafts, keep refining your approach: choose sturdy bottles, invest time in finishing details, match colors to your living spaces, and design with safety and repairability in mind. Over time, you will likely find that your favorite decor and garden tools are not the ones you bought, but the ones you crafted yourself from what would have been thrown away.
Excerpt:
Stylish plastic bottle crafts offer a practical way to reduce waste while adding personality to your home and garden, from chic vases and storage solutions to vertical planters, bird feeders, and DIY irrigation. With careful design, safe materials, and thoughtful finishes, upcycled bottles can become durable, attractive pieces that support a more sustainable lifestyle.

Maira Lindey is a home decor enthusiast who loves transforming ordinary spaces into warm, stylish havens. Through her writing, she shares simple, creative ideas that help people make their homes both beautiful and comfortable. Her approach combines aesthetic charm with practical solutions for everyday living.
With years of experience experimenting with colors, textures, and layouts, Maira enjoys guiding readers to express their personality through home design. She believes that even small changes can have a big impact, and she focuses on tips that are easy to implement without overwhelming the space or the budget.
Beyond decorating, Maira finds inspiration in nature, art, and everyday life. She encourages her readers to embrace creativity and make spaces that feel uniquely theirs, blending functionality with style in ways that are both inviting and livable.